Showing posts with label fiber art. Show all posts
Showing posts with label fiber art. Show all posts
Nov 6, 2012
Look What I did Today!
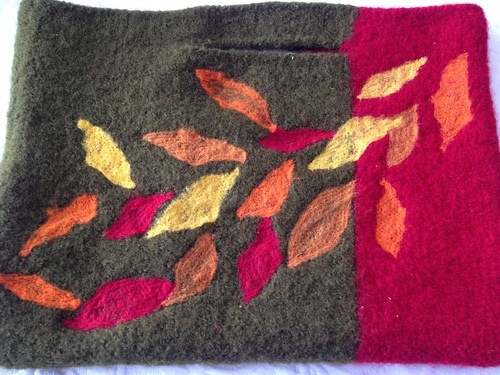
I needle felted all of my leaf cutouts onto my felted bag. I lost the perfect shape of most of my cutouts, but I am happy with how they turned out because now they look more like leaves in the wind in the Fall, which was the feeling I was going for. I still need to add some embroidery/beading.


Oct 6, 2012
Embellishing
I had a crafty afternoon with my friend Karen. Our theme of the day was felt. She made a needle felted snowman. I planned and pinned some embellishments for my felted bag. The bag was originally knit in 100% wool yarn, and then felted in the washing machine.
I cut some leafy shapes out of prefelt in fall colors and laid them out. I pinned them down so they would stay where I wanted them until I got home, I plan to needle felt them to the bag using my Embellisher machine.
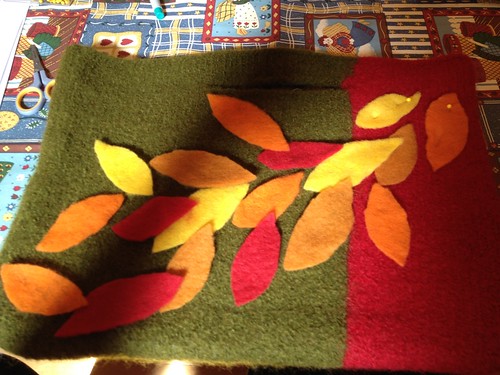
I cut some leafy shapes out of prefelt in fall colors and laid them out. I pinned them down so they would stay where I wanted them until I got home, I plan to needle felt them to the bag using my Embellisher machine.
Apr 4, 2009
Quilt Show Inspirations

Today my friend Karen and I went to a quilt show in Lancaster, PA. It was fabulous- so many inspiring works. The above photo is the wall of colorful quilts that greeted us as we entered the exhibit.
 I loved this quilt because the sheep can remind us not to take ourselves so seriously. Don't get me wrong, it was a fabulous quilt, with a ton of work. It was also a picture of a grinning sheep wearing red sneakers.
There were a lot of quilts, like the one here on the right, that pictured trees, mostly closeups of branches, rather than the entire tree, and often not a realistic representation, but more a suggestion of trees.

This quilt had fabulous quilting, couched fibers with beads, and some cool transfers and photos of leaves. We are going tomorrow to see some cherry blossoms, and hope to take some photos that maybe we can use in a quilt. Below is a detail which I hope shows you the quilting and couching.

This quilt was unbelievable: each little flower is a separate piece. Often for groups of little flowers, people find a fabric with pictures of the flowers, and sew that onto the quilt, but on this one the person cut each flower
 individually!
Well these are just a few examples of some of the wonderfully inspiring pieces that we saw today. They made me want to run home and sew.
Jan 25, 2009
Fiber Art Explorations 2009 Part 2
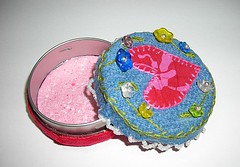
For my second trade of the year in Fiber Art Traders, I made this altered tin. The theme was Cupid's delight, and it had to be based on a mint tin and include one heart. I appliqued a batik heart onto a piece of denim (the leg of a pair of jeans- the body is already a purse!) I embroidered in feather stitch along the rim of the top, and then made stem stitch vines and satin stitch leaves. I sewed on some flower shaped buttons. I then glued the denim to the lid, and also covered the bottom of the tin with some red velour I had leftover from a robe I made my mom. I made a little scalloped edge with seed beads on the lid. Inside I placed some handmade paper I bought.
This was a really fun trade, and I can't wait to see what my partner has done!
This was a really fun trade, and I can't wait to see what my partner has done!
Jan 8, 2009
Fiber Art Explorations 2009 Part I
I started sometime last year wanting to explore the fiber artist within me, and to help achieve that I joined a yahoo group called Fiber Art Traders. (Yes, it is FAT for short!) This is a group of wonderful artists that share ideas, talents and then trade the resulting works of art.
One of the current trades is a challenge to make fiber art postcards with a wintry theme that are felted or incorporate felt. I pulled my Babylock Embellisher out of mothballs, dug through my fiber stash to find something resembling snow, and went to work. I started with a background of the leg of an old pair of jeans (the body of the jeans is already a purse!), and needle felted the fiber into it to be snow on the ground and then a snowperson. Then I added a scarf of eyelash yarn, and a red hat of a bali cotton batik print. The result was the snow divas pictured here!
I used embroidery to add the details, then mounted the fabric to a backing of pink cardstock (they are snow divas after all!).
I thoroughly enjoyed the felting process, and decided to leave that machine on my worktable for the week. I have a lot of colors of fibers I would like to experiment with. First, I need to figure out how to change the needles in my machine!
Also, I am excited to mention that I have a few pieces hanging in an exhibit- The Cyber Fyber Exhibition! To get your art into this exhibit, all you had to do was trade with the artist, so it's not like I am suddenly some great "ahteest" or anything, but I am still thrilled to think of my little works of art hanging in a gallery. My postcard is number 232, and my ATC is nnumber 157. I think the exhibit looks beautiful, and wish I could see it in person!

One of the current trades is a challenge to make fiber art postcards with a wintry theme that are felted or incorporate felt. I pulled my Babylock Embellisher out of mothballs, dug through my fiber stash to find something resembling snow, and went to work. I started with a background of the leg of an old pair of jeans (the body of the jeans is already a purse!), and needle felted the fiber into it to be snow on the ground and then a snowperson. Then I added a scarf of eyelash yarn, and a red hat of a bali cotton batik print. The result was the snow divas pictured here!
I used embroidery to add the details, then mounted the fabric to a backing of pink cardstock (they are snow divas after all!).
I thoroughly enjoyed the felting process, and decided to leave that machine on my worktable for the week. I have a lot of colors of fibers I would like to experiment with. First, I need to figure out how to change the needles in my machine!
Also, I am excited to mention that I have a few pieces hanging in an exhibit- The Cyber Fyber Exhibition! To get your art into this exhibit, all you had to do was trade with the artist, so it's not like I am suddenly some great "ahteest" or anything, but I am still thrilled to think of my little works of art hanging in a gallery. My postcard is number 232, and my ATC is nnumber 157. I think the exhibit looks beautiful, and wish I could see it in person!
Sep 15, 2008
Fiber Art Explorations 3
I have had a busy time lately, with my oldest son heading off to college, and my younger starting 8th grade and playing football. I have been trying to carve out time to continue my fiber art explorations though. I am going to talk about them in no particular order, mainly commenting on the pictures I have to share with you:
Here is a picture of some felt leaves I made for a trade in Fiber Art Traders. They are double layers of wool blend felt, cut in the shape of oak leaves and with the veins embroidered on with a variegated thread. I chose oak leaves because there was until recently a historic oak tree in my town of Gaithersburg, MD.
 To make those leaves, I got brave and printed the inspiring words I needed onto muslin fed through my printer. I have a long standing phobia about this, but I survived and it worked on the second try!

I tea dyed some muslin which I plan to use on an art piece which will incorporate an old picture of a distant ancestor. I have tea dyed before years ago, but this time I fan folded the fabric, and it really gives me a different texture.
 Here are some fibers I traded with my Fiber Art Traders group. We traded with 10 people, so now my stash is really growing!
 I made these inchies to trade with Fiber Art Traders. They have an Olympic theme, and I transferred the icons for 5 different sports using the gel medium technique (see fiber arts exporations 2). Ziggzagged the edges with my first spool ever of sulky thread- love the sheen!
 I reorganized my sewing area, with these shelves above my work surface to hold my various fibers, plus zippers, fusibles, etc.
 I am continuing on my Take a Stitch Tuesday, I am currently 2 stitches behind - I will post a new pic when I catch up!
 I was reading about buttons made with fiber, and follwed a link to a tutorial to make these Dorset buttons. I made a few using variegated DMC floss. I am not sure what to do with them, I might try them in some jewelry creations!
 Stay tuned for more fiber art explorations!
Here is a picture of some felt leaves I made for a trade in Fiber Art Traders. They are double layers of wool blend felt, cut in the shape of oak leaves and with the veins embroidered on with a variegated thread. I chose oak leaves because there was until recently a historic oak tree in my town of Gaithersburg, MD.
 To make those leaves, I got brave and printed the inspiring words I needed onto muslin fed through my printer. I have a long standing phobia about this, but I survived and it worked on the second try!
I tea dyed some muslin which I plan to use on an art piece which will incorporate an old picture of a distant ancestor. I have tea dyed before years ago, but this time I fan folded the fabric, and it really gives me a different texture.
 Here are some fibers I traded with my Fiber Art Traders group. We traded with 10 people, so now my stash is really growing!
 I made these inchies to trade with Fiber Art Traders. They have an Olympic theme, and I transferred the icons for 5 different sports using the gel medium technique (see fiber arts exporations 2). Ziggzagged the edges with my first spool ever of sulky thread- love the sheen!
 I reorganized my sewing area, with these shelves above my work surface to hold my various fibers, plus zippers, fusibles, etc.
 I am continuing on my Take a Stitch Tuesday, I am currently 2 stitches behind - I will post a new pic when I catch up!
 I was reading about buttons made with fiber, and follwed a link to a tutorial to make these Dorset buttons. I made a few using variegated DMC floss. I am not sure what to do with them, I might try them in some jewelry creations!
 Stay tuned for more fiber art explorations!
Jul 6, 2008
Fiber Art Explorations 2
I continued in my quest to try out as many fiber art techniques as I can find. I am sort of using one at a time, and as I get more secure, I will start mixing it up a bit.
First, I fused some cool Angelina fiber to itself, then put the resulting sheet of weblike fibers on top of some mistyfuse and fused again. All this was accomplished with my trusty iron, between 2 sheets of parchment. The result was a sheet of angelina that can be cut and fused like any applique. I cut mine into random strips and fused it onto some green mottled fabric.
 The next technique I tried was painted fusible web! I just took a sheet of fusible web, and painted it with some red craft acrylic paint. After it dried, I used a shape cutter I have for scrapbooking, and cut the web, some circles, hexagons and the letters to spell peace. then I laid out the web onto some black and white print fabric, and ironed it between two sheets of parchment. I think the results look really great, and I plan to paint up some more web and try to overlap some different colors!
 Then I did a transfer of a picture to fabric using Golden Matte Gel Medium. I printed a picture onto the rough side of a transparency using my inkjet printer. Then you take the fabric of choice, in my case a batik, and paint the medium onto the fabric. Then lay the picture transparency on the medium and burnish. I loved this and hope it always goes as well as my first attempt went!
 Also, this week I joined the Stitchin Fingers community on Ning, and there I found a group doing TAST or Take a Stitch Tuesday, where you explore a new embroidery stitch each Tuesday. I was late joining in, so I did 4 stitches last week- Herringbone, buttonhole, detached chain and cretan. After practicing on a sampler, I used some of the stitches in these Dottee dolls I was working on for a FAT trade.
Tonight I made these paper beads:

I have wanted to make paper beads for so long! These are from the colorful pages of a Hancocks of Paducah fabric catalog. They send me a catalog with each order, so I want to put them to good use!
On Saturday, a friend and I went to a place in ALexandria, VA called the Torpedo Factory art Center, which is full of studios with the artists working and displaying their work. It was so inspirational. Too bad I have to do garment sewing this week, but my mom and I both need new robes, so that is what I will be making.
Jun 29, 2008
Fiber Explorations Part I
I have been quilting for years, but tend to cling rather stubbornly to the more traditional aspects of the craft. I recently started exploring my inner fiber artist buried deep within...or rather dragging her out kicking and screaming. I think the scientist in me finds comforts in the rules and formulas involved in traditional quilting techniques. However the artist in me is always drawn to the more "artsy" items I see.

...and here are some hair pins I made from them with some beading added:
 Next, I took some black and white print fabric for the background and made some inchies where I couched some fancy yarn onto the surface of them:
 I have not done anything with those yet , but I think they are very interesting.
Stay tuned for my next installment, where I will play with Angelina fibers and maybe some picture transfers to fabric!
While looking for resources to read about art quilts, I stumbled upon a group called Fiber Art Traders, or FAT for short, on Yahoo. These wonderful artists share techniques and trade items they make. SO far I have participated in a trade where we made paper towel jewelry, and one where we made button fairies.
Here is an example of my paper towel jewelry:
 And here are my button fairies:

About the time I found FAT, I read an article by the leader of FAT, Normajean Brevik, where she was talking about inchies. Inchies are little one inch square art pieces, which can be done in many different mediums, but her article was talking about fiber art inchies. So I started exploring different techniques in fiber art, and making different batches of inchies.
First, I made a batch where I fused fabric to a background, then laid organza over it and machine quilted the surface. Here are those inchies:
...and here are some hair pins I made from them with some beading added:
Next, I took some black and white print fabric for the background and made some inchies where I couched some fancy yarn onto the surface of them:I have not done anything with those yet , but I think they are very interesting.Stay tuned for my next installment, where I will play with Angelina fibers and maybe some picture transfers to fabric!
Subscribe to:
Posts (Atom)